Industrial Chandelier from Salvaged Pieces

Image

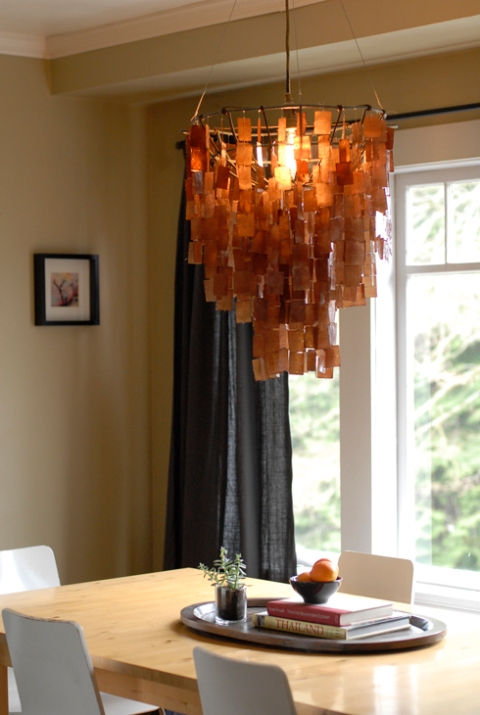
What other people may see as junk is just a possibility for me.  It’s a sickness really, one that I know I share with others of you out there.  Left unchecked it will consume my house with endless projects.  I’m on a mission lately to finish one project at a time and I’ve gotten pretty good at ignoring the cries for salvation that I hear from Craigslist or the curbside.  This industrial chandelier is my latest finished project.  I thought I’d share.  Maybe it will help to spark an idea for someone else out there.  If it does I’d love to hear about it!

The capiz shells came from a screen to hang in a door frame (think of the 70’s and beads and maybe Greg Brady and you know what I mean).  I came across the discarded Capiz screen first, at Scrap, a place in San Francisco that accepts items to be reused mainly by artists.  Then I found the metal frame, a salvaged piece from a 100 year-old house.   It was the inner structure to a large and, I am assuming, very heavy ceiling light.  I tied all the capiz shells to the frame with fishing wire.

I like the way the industrial metal and the delicate capiz contrast.

Pretty good for “junk” huh?

Flowers for an Easy Pop of Color

   Source

What is the easiest, least expensive and most impactful way to add color to any room?  Flowers! (And during my first Seattle winter, boy do I need that pop of color!)  Just look at your favorite photos of interiors.  Nine out of ten have flowers or some sort of greenery.  Why… because with them, suddenly your room has energy and life.

If you want to get more sophisticated you can match the color of your flowers to something in the room you would like to highlight, say a favorite art piece.  Suddenly your eye is drawn right to that piece.

I absolutely adore the arrangement above, but let’s face it, it’s not something I can keep up with on a weekly basis.  So I’ve gathered some arrangements below that will take five minutes.  Besides, I’m drawn to their un-fussiness.

  top source, bottom source

I can easily adjust these arrangements for whatever flowers are in season on my weekly trip to the farmer’s market or grocery store.

(Clockwise from top left.)  The first arrangement uses the same flower throughout.   Here they’ve added interest by graduating the color, starting with the lightest blossoms in the center and working out to the deepest hues.  The stems need to stay a little taller for the center of the arrangement and gradually taper as you get to the rim of your vase.  Aren’t these Lilacs so romantic?  If your going for a more elegant or formal look, try it with roses.

For the next arrangement you will need some supplies: floral frogs (round little metal spiky things) and clay to secure them in the bowls.  Other than having those things on hand, it is a snap to put together.  Just secure the frogs in the bottom of your container with the clay, push one or two stems into the spikes and add water .

Lastly, just one beautiful bud in an interesting container can have an amazing amount of impact.  Be creative with your containers, here it’s just an ornate mug.   Or do a grouping of single buds, each in their own vase like below.  Still incredibly easy.

…so much reward for so little effort.

In Season: Kale Chips

via A Thought for Food

The winter holidays are over now and what’s left, but to cozy up for the long dark nights of winter.  As I write this here in Seattle the snow is coming down for the third day in a row, the roads are icy, but our fireplace is going and I’m looking forward to wrapping up in a blanket with some wine and a good movie.

What is needed is a little comfort snack food that won’t break my New Year’s resolutions.  I’ve got a good one to share with you – kale chips.  Trust me, I know you may be skeptical, but they are so good.  And they are so fast to make and kale is currently in season in most states.

via Garden Betty

via A Thought for Food

Ingredients:

bunch of kale
2 tbsp olive oil
sea salt to taste

Optional
Garlic salt
Thyme
Garlic salt and shredded parmesan
Smoked paprika

Directions:

  1. Preheat oven to 325 degrees.
  2. Wash kale and dry in spinner.  It is important that the kale be dry.  Remove the stems from the kale and tear into large pieces
  3. Add olive oil and sea salt to a large bowl.  Add kale and toss to coat with olive oil mixture.
  4. Line a cooking tray with parchment paper and spread the kale in a thin layer.  Bake for 10-20 minutes.  Be sure to check at the 10 minute mark.  Kale should remain a nice deep green

I’ve included a list of optional ingredients that you can use to add a little extra zing to your batch, but really, use your imagination, almost anything goes.

via Miss.Adventure@home

Here’s the low down on kale so that you can feel extra proud of yourself.  Kale is actually a form of cabbage and is loaded with fiber.  One cup of kale gives you twice your daily vitamin A, a ton of vitamin C, and 1,000 times your RDA for vitamin K.

Meatless Monday: Black Bean Soup with Avocado, Orange and Cucumber

         Via Sunset Magazine

This is one of my favorite soups of all time because it hits the 3 points that some nights call for: it’s fast, it’s healthy, and it’s affordable.  Oh and I forgot, it is also vegetarian and its delicious!  Because of its simplicity I was skeptical.  I like a cooking challenge… not every night, but on those lazy nights we usually get good filling food, but not great food.  This soup changed that because it really is the bomb.

I’m not going to detail it all out because you can find it all here.  Also, if you have trouble finding Cotija, I have substituted feta and it works well.

Martini Bar

          Via Karen Mordechai and Sunday Suppers

We love the pairing of clear glass and tarnished silver for this Martini Bar from Sunday Suppers.  Clear glass lets the beauty of the ingredients shine.  While the tarnished silver reminds us that the old and warn has a beauty all its own.  How fun to pull out your grandmother’s old pieces and pair them with a simple modern arrangement.  Or to scout some vintage finds at the Goodwill or consignment shops.

Did you know that linen uses less water, insecticide, and pesticide than cotton?  Even organically grown, cotton needs to be heavily irrigated.  Bamboo is a good choice only if it is eco certified, otherwise it is often manufactured into cloth using harsh chemical solvents.  Hemp on the other hand, needs no pesticides or insecticides and actually improves the soil where it is grown.  Wool is great too because it is renewable, has lower carbon emissions than man-made fibers, and, as with linen and hemp, is biodegradable.

Mix in some aged pieces like the tarnished silver above.  It’s a great excuse to go rummaging through all those forgotten treasures you’ve stored away.  Or call a friend to scour the local consignment shops and estate sales.  It’s a ton more fun to hunt for a “find” with a past than to pick something off the shelf at Pottery Barn.

So this is the big one for me!  Occasionally, we all need to purchase something.  What if our purchases were so well designed that they didn’t have any negative effect on the environment in their manufacture, their use, or their end of use?  What if instead of taking advantage of the people who made them, our products celebrated and honored craftspeople.  Make a purchase that moves us in this direction.  Purchase a piece that uses recycled materials, gives to a charity, or supports an artisan in a transparent way.  And above all make it quality, so it becomes the vintage piece your son or daughter uses.

I know, I know sometimes the price difference makes it so hard.  But if you buy organic you are greatly reducing toxic water pollution caused by the runoff of pesticides and herbicides into streams and lakes (among other environmental benefits).  Not to mention that to buy otherwise means you are ingesting those nasty chemicals.

Buying local just got even more fun.  Local spirits are a growing trend, at least here on the west coast.  I was so excited to find that in Seattle there are 40 licensed distilleries!  That’s a lot of tasting.  I’m looking forward to trying Ebb and Flow and Single Silo Vodka, which seem to have quite a following around here.

Hope this helps as we move into party season.  Cheers!  Oh and if you want to share what you put together, I would love to hear from you.  Email FormaLiving@gmail.com

Meatless Monday: Cantal Cheese Tart

Via bon appetit

Ever since moving to Seattle, I can’t get enough of two things… cheese and chocolate.  It has something to do with the cold rainy weather that has me craving these comforts.  So for Meatless Monday I’m cooking this Cantal cheese tart.  This recipe comes from Le Temps Des Vendages, a city in Southern France via Bon Appetit’s May 2010 issue.  Our decision to partake in Meatless Mondays came from knowing how detrimental cattle and poultry raising can be on the environment, and not from health concerns.  Although it is perfect paired with a salad, clearly, the cream, butter, and cheese in this recipe do not qualify it as a particularly healthy choice.  Unless maybe you consider cheese to add something to your happiness.  Mental health is important, right?

via Brown Dress with White Dots

The Cantal cheese can be substituted with an English farmhouse cheddar or a sharp white cheddar, I’m using Beechar’s Flagship, a cheese made locally here in Seattle.  Making the crust is a little challenging, but the filling is a breeze.

Ingredients:

Crust
1-1/4 cups all purpose flour
1/4 tsp. salt
6 tbsp. chilled unsalted butter, diced
3 tbsp. (or more) ice water

Filling
1 tbsp. unsalted butter
1/2 cup chopped shallots
1-1/4 cups heavy whipping cream
3 large eggs
1/8 tsp. freshly ground black pepper
1/8 tsp. freshly grated nutmeg
Pinch of salt
2 cups coarsely grated rindless Cantal cheese (or substitute)

Directions:

1. Blend flour and salt in processor for 5 seconds.  Add butter and cut in, pulsing on/off turns, until a course meal forms.  Add 3 tablespoons of ice water.  Blend until moist clumps form, adding more water if dough is dry.  Gather dough into a ball, wrap it in plastic and refrigerate for at least 1 hour and up to 1 day.

2. Roll out the dough on a lightly floured surface to about 12″ – 13″ round.  Transfer to a 9″ tart pan with removable bottom.  Create a 1/2″ overhang by cutting off any excess dough.  Fold overhang in and press sides so that the sides of the dough rise 1/4″ to 1/3″ above the rim of the pan.  Freeze the crust 15 minutes.

3. Preheat the oven to 375 degrees.  Line the crust with foil and fill with beans or pie weights.  Bake about 25 minutes until sides are set.  Remove beans and foil and bake until crust is golden about 20 minutes.  (Peirce with a fork if the crust bubbles.)  Cool crust.  Lower oven temperature to 350 degrees.

4. Melt butter in a heavy medium skillet.  Add shallots.  Season with salt and pepper. Saute until soft about 4 minutes.  Meanwhile whisk cream, eggs, pepper, nutmeg, and salt in a medium bowl.  Mix in cheese.  Spread shallots in crust. Pour cream mixture into crust.  Bake until filling is set in the center, 35 to 38 minutes.  Cool for 15 – 30 minutes and serve warm or at room temperature.

Meatless Monday’s have really been a fun way to challenge my creativity in the kitchen.
Succulent Screen

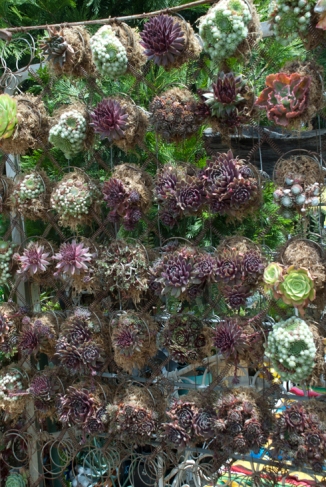
Down the street from me is a home like no other.  The yard is fenced with old wooden skis, a 1940’s mint green Chevy truck is parked in the driveway and the house is adorned with every kind of old funky sign you can imagine.  So with all this kitsch to keep my attention it was my man who noticed the cool succulent screen that I want to share with you.  It is created from the interior of an old mattress!  Couldn’t you see couple of these around a modern walled-in back patio (the kind you see in Dwell magazine)?   They would give it a textural backdrop with a touch of an industrial feel.

Rooty, the home’s owner explained the how-to.  He removed one side of the mattress frame (so that it is just one rectangular frame and then the coils projecting back from that, you can see the coils in the photo below). First line each mattress coil with moss, fill it with soil, and pop in the plant.  The moss keeps the soil and the plant snug and secure.  So easy!

Green Guide: Wallpaper

Scrapwood by Piet Hein Eek via Wallpaper Collective

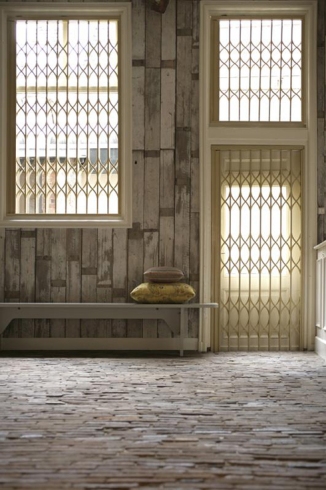
I am in LOVE with this wallpaper and this shot… the mix of textures with the very soft color pallet and those beautiful wrought iron window grills!  And don’t you just love the cobblestone floor?  The paper is called Scrapwood and there are many different versions with variations on color and wood.  I found this at the Wallpaper Collective.  If you don’t already know this site, it’s worth checking out.  They have a vast selection of papers, including many sustainable choices.

Bittern Feather by Graham and Brown

Graham and Brown also has a nice selection of eco-friendly choices.  I liked the romantic feel of this Bittern Feather pattern that was designed in collaboration with students at Central St. Martins College in London.

Dandelion Mobile by Miss Print

I love the retro pop of this pattern.  Something about the yellow version reminds me of my grandmother’s house as a little girl.  I could see it in a baby’s room paired with modern clean-lined furniture.

DIY: 5 Steps to a Shoe Storage Solution

Finished Project/Inspiration via Apartment Therapy

When I came across this vertical shoe storage solution by stylist Sidsel Zachariassen in Apartment Therapy, I knew the neat vertical rows were going to be the only solution for the tight entryway I’m working on. While I liked the idea of purchasing a collector’s shelf for the job, I needed an exact width and I really preferred her cleaner version. So, I spent a little time in the aisles of Home Depot dreaming up my own creation. At about $12 a shelf for all of the materials, it was a steal (Pottery Barn Collector’s Shelf, $54). And, it really was incredibly easy to put together… I didn’t even pull out the electric screw driver. The hardest part for me was waiting for the paint to dry so that I could hang it. Make sure to pre-cut all your molding pieces to the desired width of the shelf (remembering to add the width of the baseboard ends to the final width) before you leave the Home Depot.

Materials:

  • 1 piece 1-1/2″ molding, cut to desired length
  • 1 piece 4-1/2″ molding where the width tapers, cut to desired length
  • 2 rectangular baseboard molding pieces
  • 1/8″ screws
  • 1″ L brackets
  • 2″ x 1/2″ mending braces
  • 2 keyhole fasteners
  • wood glue (optional)

Instructions:

1. Screw 2 mending brackets on each end of 4-1/2″ molding to the bottom of the baseboard pieces. Use wood glue first and let dry to hold the pieces in place, if you have the patience for this extra step.


2. Screw L bracket to either end of the 1-1/2″ molding.

    3. Attach each opposite corner of the L bracket to the inside of baseboard piece at the height you desire to hold the shoes vertically and so that the front of the 1-1/2″ molding piece is flush with the front of the baseboard piece. I attached my molding piece about 1-1/2″ from the top of the baseboard piece.
    4. Attach the keyhole fasteners to the back of the baseboard pieces on both sides.
    5. Paint your creation and viola your ready to hang!

Parmesan Popcorn

The festivities are over…  the champagne popped, the tree ornaments packed away till next year.  After all that hustling, a little down time is in order.  On these cold winter nights, in my mind, nothing is better than to curl up on the couch with a bowl of popcorn and a glass of wine and read a good book or watch a movie.  I want to share with you my favorite popcorn recipe.

It is not only easy and delicious, but it’s a healthy twist for all of us whose New Year’s resolutions include shedding a few pounds.  I know your probably a bit skeptical… and I too consider myself a popcorn purist (I do love the buttery goodness)… but I swear this has so much great flavor you won’t miss it.

For those of you who may want the numbers: 1/3 cup of Parmigiano-Reggianno is 110 calories and has 8 grams of fat, compared to 303 calories and 34.6 grams of fat in just 3 tablespoons of butter.  Can’t wait to curl up with The Girl with the Dragon Tatoo, am I the only who hasn’t read this yet?